Modeling - Techniques, tutorials and inspirations
Techniques, tutorials and inspirations
Modeling a vase in mixed clay
Beat his land
This is step number 1 of clay modeling! If you are working with self-hardening clay, you do not need to go through this step. This allows you to homogenize the clay and to expel air bubbles. These are dangerous for your pieces, because trapped in the clay, they cause cracking during cooking. It is therefore very important to beat the clay carefully. Read these steps and watch the video before you start modeling, they will help you make the strongest piece possible.
The steps
- Place your wooden plate on your work surface
- Form a ball of earth in your hands
- Tap it vigorously to give it a nice round shape.
- Place your ball of earth on your plate, position your two palms on the ball, fingers facing outwards surrounding the ball
- Position your body to put strength in your palms, stand with your starting foot forward
- Press with your whole body on the ball, the force must be concentrated in your palms, and your fingers must prevent the ball from flattening on the sides: it must roll forwards
- Reposition your beaten ball in the center of your plate, and repeat the operation.
- After several minutes, the ball should look like a ram's head: between your palms it should have a snout, and on the sides you should see horns curling in a spiral!
- Once the earth is beaten in one direction, turn your ram's head a quarter turn and start again! Until you get a ram's head in that direction again
- Once your clay has been beaten for several minutes, take it in your hands and throw it several times on the plate in order to make a small square of clay ready to use.
Make a cup of coils
The coil technique allows pieces with original shapes to be assembled, while giving them good solidity.
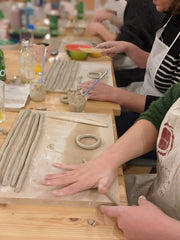
- Prepare clay sausages, called "colombins", of the same thickness and length.

- Form a circle with a first sausage. To stick the two ends of the coil together, add a little water with your fingers.
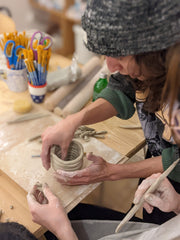
- Using a sharp knife or a wooden pick, make light crosses all over the top of your sausage. Moisten these crosses with your fingers and place a new coil on top, still in a circle.
- Continue stacking the coils to the desired height, then set aside.

- Take a small ball of clay and flatten it with a roller or by hand to obtain a slab of clay of uniform thickness, not too thin.
- Place your previously made tower of coils in the center of your plate.
- Cut a rounded shape out of the clay slab by running a sharp knife all around your lowest coil. Remove the excess from your clay slab.
- Between the round clay plate and your first coil, make small crosses on the contact surface, then moisten with your finger to stick the two parts together.
- Use a wooden tool or your fingers to smooth the entire exterior (and interior if you wish) surface of your creation. Smooth the walls until the sausages are no longer visible.

- Add details if you wish: handles, writing...

The steps
- Take a handful of earth from your beaten clay
- Pinch it in the palm of your hands to start giving it a sausage shape.
- Continue to pinch it gently to lengthen it
- Place your coil on your earth plate
- Put your hands together and then roll the coil in large movements.
- Move your hands to refine the coil evenly.
- Don't press too hard, the coil will become thinner through repeated movements! If you press too hard, you will give it an angular shape.
- Keep your coils thick enough, this will make it easier to assemble your piece and ensure better strength!
Once your coils are made, you can refer to the coil modeling technique. Stack them, by slathering them, while trying not to overlap your seams all in the same place (this would weaken the piece). Then melt your coils with your finger or with a tool, on the outside as well as the inside of the piece.
Making a pottery on the plate
The slab technique is widely used in modeling, but you still need to know how to make a good slab! As with the previous step where you beat the clay, you need to be careful of air bubbles, so use a sharp object during this step.
The steps
- Take a handful of earth from your beaten clay
- Form a ball in your hands (without kneading the earth too much because you risk adding air)
- Place your ball on your plate
- Start by flattening it by tapping it with the flat of your hand.
- Once you have roughly flattened your ball, equip yourself with a rolling pin, a glass bottle, or a can...
- Spread your ball starting from the center upwards, then from the center downwards.
- If you want your plate to be the same thickness everywhere, you can put two magazines of the same thickness on either side of your plate, and roll with your roller on it: this also allows you to level your plate, not to make it too thin
- When you see air bubbles rising, prick them with a sharp tool, a knife tip for example, erase the trace with your finger, and continue to flatten
- You can turn it over to smooth it on both sides.
- If you find that the surface is too rough, you can use an old loyalty card to smooth the plate, it's magic!
- Once you have nice plates, you can form your piece by assembling them, using an earth glue called slip (continued below!)
Make a vegetable texture bowl
This tutorial will allow you to create your own self-hardening clay objects, with a plant motif of your choice. You will need:
- Clay
- Leaves or flowers of your choice. Choose green leaves that are still flexible, dried flowers are fragile and may “break”.
- From a knife
- From a cylindrical object (modeling or rolling pin, glass bottle, can)

The steps
- Roll out your clay using a roller or a glass bottle, so as to keep a good uniform thickness (around 5mm)
- Place your plant where you want to have its imprint
- Take your roller again and go over the plant again.
- Remove it very delicately (if you have chosen a plant with multiple details, opt for tweezers to detach it)
- Cut out a circle surrounding the imprint of the plant, in order to obtain a cup.
- Place it in a bowl so that it fits the slightly hollowed shape
- Leave to dry for 24 hours
- Paint your bowl with acrylic, or leave your work “natural”!
Make a bowl with inlaid colored earths
With this tutorial, you will be able to make beautiful multi-colored pottery using self-hardening colored clays! You will need:
- Self-hardening white earth
- Self-hardening colored earths
- A knife
- A wooden pick
- A cylindrical object to spread your soil
- A dishcloth

The steps
- Spread your white clay on your work surface then cut out a circle the size of the desired cup.
- Spread some colored clay, quite thinly (2mm)
- Using your wooden pick, draw the shapes you want to embed in your white plate.
- Cut them with your knife
- Place them on your white plate
- Tap them with the palm of your hand to make them enter the white earth
- Place a cloth on your plate, then roll it out to firmly press in the colored earths.
- Then you can put the drying plate in a bowl so that it takes the shape of a cup.
Watch the video here;


